PaceBook PaceBlade: The Tablet PC Arrives
by Matthew Witheiler on May 17, 2002 12:00 PM EST- Posted in
- Laptops
The other items of interest on the PaceBook's display/system unit are located on the left and top of the system when in landscape mode. This seemingly unimportant characteristic of the PaceBook is actually a design trait that PaceBlade spent some time on. The reason that it was important to only have connections and controls on the system's left and top sides: because the left and top of the system quickly become the top and right sides when rotated for portrait mode. By placing connections and controls on the system's left and top side when in landscape mode the controls and ports are easily accessible when used in either landscape or portrait mode. In either configuration connections and controls are never on the bottom side of the system. It is clear that PaceBlade put some thought into designing the PaceBook for all types of use.
There are five ports located on the system's left side (top side in portrait mode). The first of these, on the bottom left, is the PaceBook's single PCMCIA slot. The system can accept one PCMCIA type II that is inserted label side down into the computer. Above the PCMCIA slot and directly in the center middle of the PaceBook's left side lies PaceBlade's unique round USB port. The port is the same a a standard USB v1.1 port except in shape. In order to make the port useful for items mounted on the top or side of the PaceBook, this USB port is round. The current PaceBook accessory that fits in this port is a USB CCD camera for teleconferencing and picture/movie capture. By fitting in the round USB port, the camera can be swiveled 360 degrees. Future accessories may include IrDA adapters and bar code scanners. Because it is a standard USB port at heart, the system comes with a dongle that converts the round USB port to a standard one. Like mounting all the controls in a location where they will never be on the bottom of the system, the use of a round USB port was a thoughtful design adaptation that suits the PaceBook ideally.
Above the round USB port are three more I/O connections, all covered by a rubber flap. Opening the flap reveals an ethernet port, a modem port, and a VGA-out port. Both an ethernet cable and a phone cord can be plugged directly into the system, while the VGA-out port requires the use of an included dongle.
The remainder of the PaceBook's I/O ports are located on the top (right) side of the system. Located in the top left side of the laptop, towards the back of the system, is the system's stylus. The stylus fits in a special slot which keeps it conveniently close at hand. The stylus collapses to fit in the slot but telescopes out to become the size of a standard pen. Slightly above and to the right of the stylus slot are the audio connections for the PaceBook: one for headphones out and one for microphone in.
The next three ports are covered by a rubber flap just like the one covering the I/O ports on the left side. Under this flap live a USB port (a standard one, not a round one), a DC-out port, and a 4-pin unpowered IEEE-1394 firewire port. The USB and firewire ports are self explanatory, but why would PaceBlade include a DC-out port on the system? The reason is because the DC-out is used to provide power for firewire devices needing it. In the case of our unit, which came with an external firewire DVD drive, the DC-out was used to provide power to the device which communicated to the PC via the unpowered 4-pin firewire port. Why PaceBlade chose to produce this unique solution instead of just implementing a 6-pin powered firewire connection is anyone's guess but it does get the job done for PaceBlade components. One step over from the set of three connections is the power-in port.
The final item on the PaceBook's top side is the "any key" and scroll wheel. The "any key" acts as an enter key and is for use when a key must be pressed to continue. PaceBlade gave it the name "any key" because it solved the problem of having to hit a key during a blue screen. The screen, which sometimes reads "Hit any key to continue" can only be removed by hitting a key on a keyboard, which is difficult to do on a keyboard-less tablet PC. The "any key" button solves that problem. To the left of the "any key" is a scroll wheel which can be used for navigation up and down. The scroll wheel can also be clicked to simulate a right mouse click. This solves the problem of registering a right click on a touch screen, although it was a bit awkward to use because the item to be right clicked must first be selected using a single click of the stylus. It would have been more comfortable and natural if PaceBlade chose to place a button on the stylus that could be held down when the user wishes to right click.
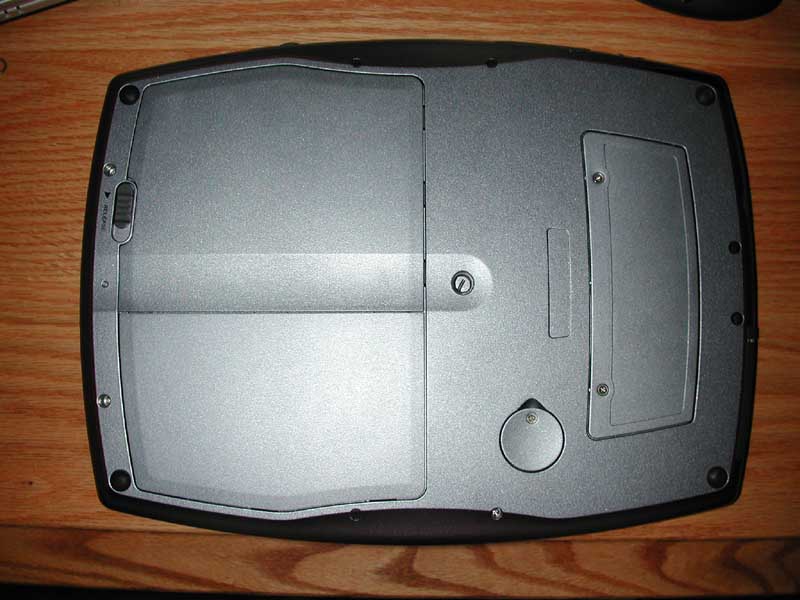
The other items of interest are located on the PaceBook's bottom. The system's bottom holds expansion slot covers that allow for easy access to many system components. The large trapezoidal cover on the system's right can be removed by unscrewing two screws. Under this panel lies the system's memory expansion slot. The PaceBook can accept one PC-133 SODIMM in addition to the built in 128MBs of system memory. Our unit, which came outfitted with 256MB of memory, shipped with this slot populated with a stick of 128MB PC-133 memory.
Interestingly enough, the circular panel below the memory expansion panel provides access to the PaceBook's CMOS battery. When designing the PaceBook, PaceBlade decided that they wanted their product to be used for years to come. Although it may serve as a business machine today, PaceBlade foresees the PaceBook acting as the children's PC or LCD television years down the road. Since CMOS batteries occasionally die, the company decided to make their CMOS battery easily replaceable. Unlike other notebooks, where the CMOS battery is non-removable or very hard to access, replacing the PaceBook's CMOS battery should prove to be no problem when the time comes.
In almost the center of the laptop is a threaded hole. This hole allows the PaceBook to be mounted almost anywhere in almost any position. PaceBlade is currently working on an office stand for the PaceBook that uses this mounting hole to attach itself to a stand. Options for car, truck, and wall mounting are in the works as well
The battery on the PaceBook is also easily removed by sliding the release lever down. Once out, a screw for a panel that covers the system's hard drive is visible. Removing this screw pops the hard drive cover off and provides easy access to the system's internal 9.5mm hard drive.
The system's case is fully magnesium and as a tablet PC the system measures a rather unwieldy 9.7"x13.0"x1.1" and weighs 3.95 pounds; rather bulky for handheld use.
So that is the PaceBook as a tablet PC. The system can be held in the hand, used on the lap, or slung around the shoulder with the upcoming tablet bag accessory. It is important to note that PaceBlade was recently named a Microsoft Tablet PC partner. This means that PaceBlade will be working closely with Microsoft in adapting the PaceBook to work with and benefit from the upcoming Windows XP for Tablets operating system. But exactly how does it act as a notebook and desktop system as well?


1 Comments
View All Comments
Dr AB - Monday, May 11, 2020 - link
That was huge and bulky. Didnt even stood a chance to be successful.