ASRock DeskMini H470 Review: A No-Frills LGA 1200 mini-PC Platform
by Ganesh T S on December 29, 2020 8:00 AM ESTBIOS Options and Platform Analysis
ASRock provides a graphical UEFI interface for the DeskMini H470. There are multiple options to tweak the performance of the system for the end-user's requirements. By default, the BIOS interface comes up in the 'Easy Mode'.

This mode provides quick access to commonly used functions - altering DRAM timings with XMP profiles (if the SODIMMs support it), updating the BIOS (either from an attached FAT16/32 USB driver, or directly from the Internet), modifying fan curves (duty cycle of the CPU fan for different CPU temperatures) quickly, changing boot priorities, and modifying the SATA controller mode (AHCI or RAID). Note from the previous section that the board has two SATA ports on the underside, and the drives attached to these ports can be operated in chipset RAID mode to present a single logical volume to the OS. Fan status, temperatures, voltage, and date information are also available in a functional layout.
The Kingston SODIMM kit used in the build supports a XMP 2.0 profile to operate with 'better than JEDEC-mandated' timings.at 2933 MHz. By default, the Auto setting falls back to JEDEC timings of 19-21-21-39. With a simple click on XMP 2.0, the system is able to configure itself for operating the SODIMMs with a 17-19-19-39 timing.

AIDA64 Memory Benchmarks : Default BIOS Settings (L), XMP 2.0 Profile Activated (R)
This can lead to a noticeable increase in memory throughput due to reduced latency as shown in the AIDA64 memory benchmark numbers above - whether this can lead to better performance for different use-cases is an exercise left out for another review. In this article, we only look at the performance of the system with the BIOS in its default settings.


The gallery above shows the various options available in the advanced mode. The base frequency boost option allows the board to plug in a higher than default TDP level. With the Core i7-10700 65W TDP model installed, the options available included values up to 90W - this is something we would have evaluated more thoroughly if we were to be considering this as a motherboard review.

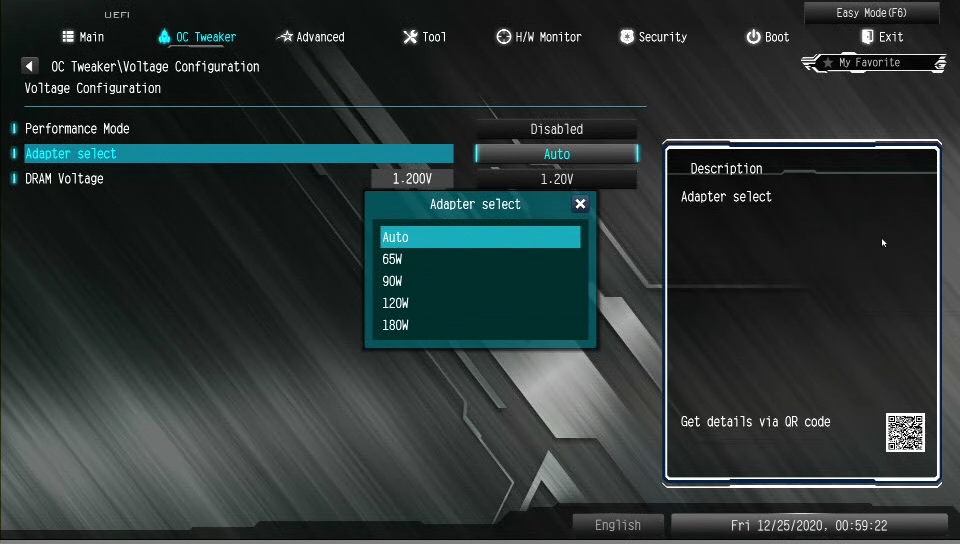
The other options in the OC Tweaker section allow fine-grained control over various CPU operating optimizations, DRAM timing parameters, and voltages. The BIOS also allows specification of the rating of the attached adapter - 65W adapters are good enough for 35W TDP processors, and 120W ones are recommended for the 65W CPU we tested with. Usage of 180W adapters allows the board to sustain higher TDP levels for the processors during workloads.
The BIOS also allows configuration of advanced settings for the CPU such as C-state support, SGX, etc. Chipset and storage device operating parameters (both SATA and NVMe) can also be controlled. USB ports can be selectively turned off. The BIOS also includes tools for setting up RAID, secure erasing SSDs, sanitizing NVMe drives, and updating the UEFI version with a single-click. ASRock's online BIOS update approach is quite helpful, particularly when considering that other manufacturers sometimes force the creation of a bootable DOS disk with the firmware file in it for update purposes.
The hardware monitoring section in the BIOS provides a view of the temperatures of various board components along with the fan speed. Tuning of the fan is also supported - different duty cycles can be configured for different temperatures. The 'FAN-tastic Tuning' approach allows this to be configured with a graphical view.

The UEFI firmware also allows BIOS passwords to be set for added security, configuration of secure boot, and setting up the security for attached drives. Various boot options can also be set (such as enabling network booting, boot order priorities, fast boot enabling, etc.). The UEFI shell can also be accessed, and one-time overriding of the boot device is also possible.
I/O Analysis
The DeskMini H470 BIOS provides plenty of tweaks for motherboard enthusiasts - however, in terms of I/O capabilities, ASRock has adopted a conservative approach.
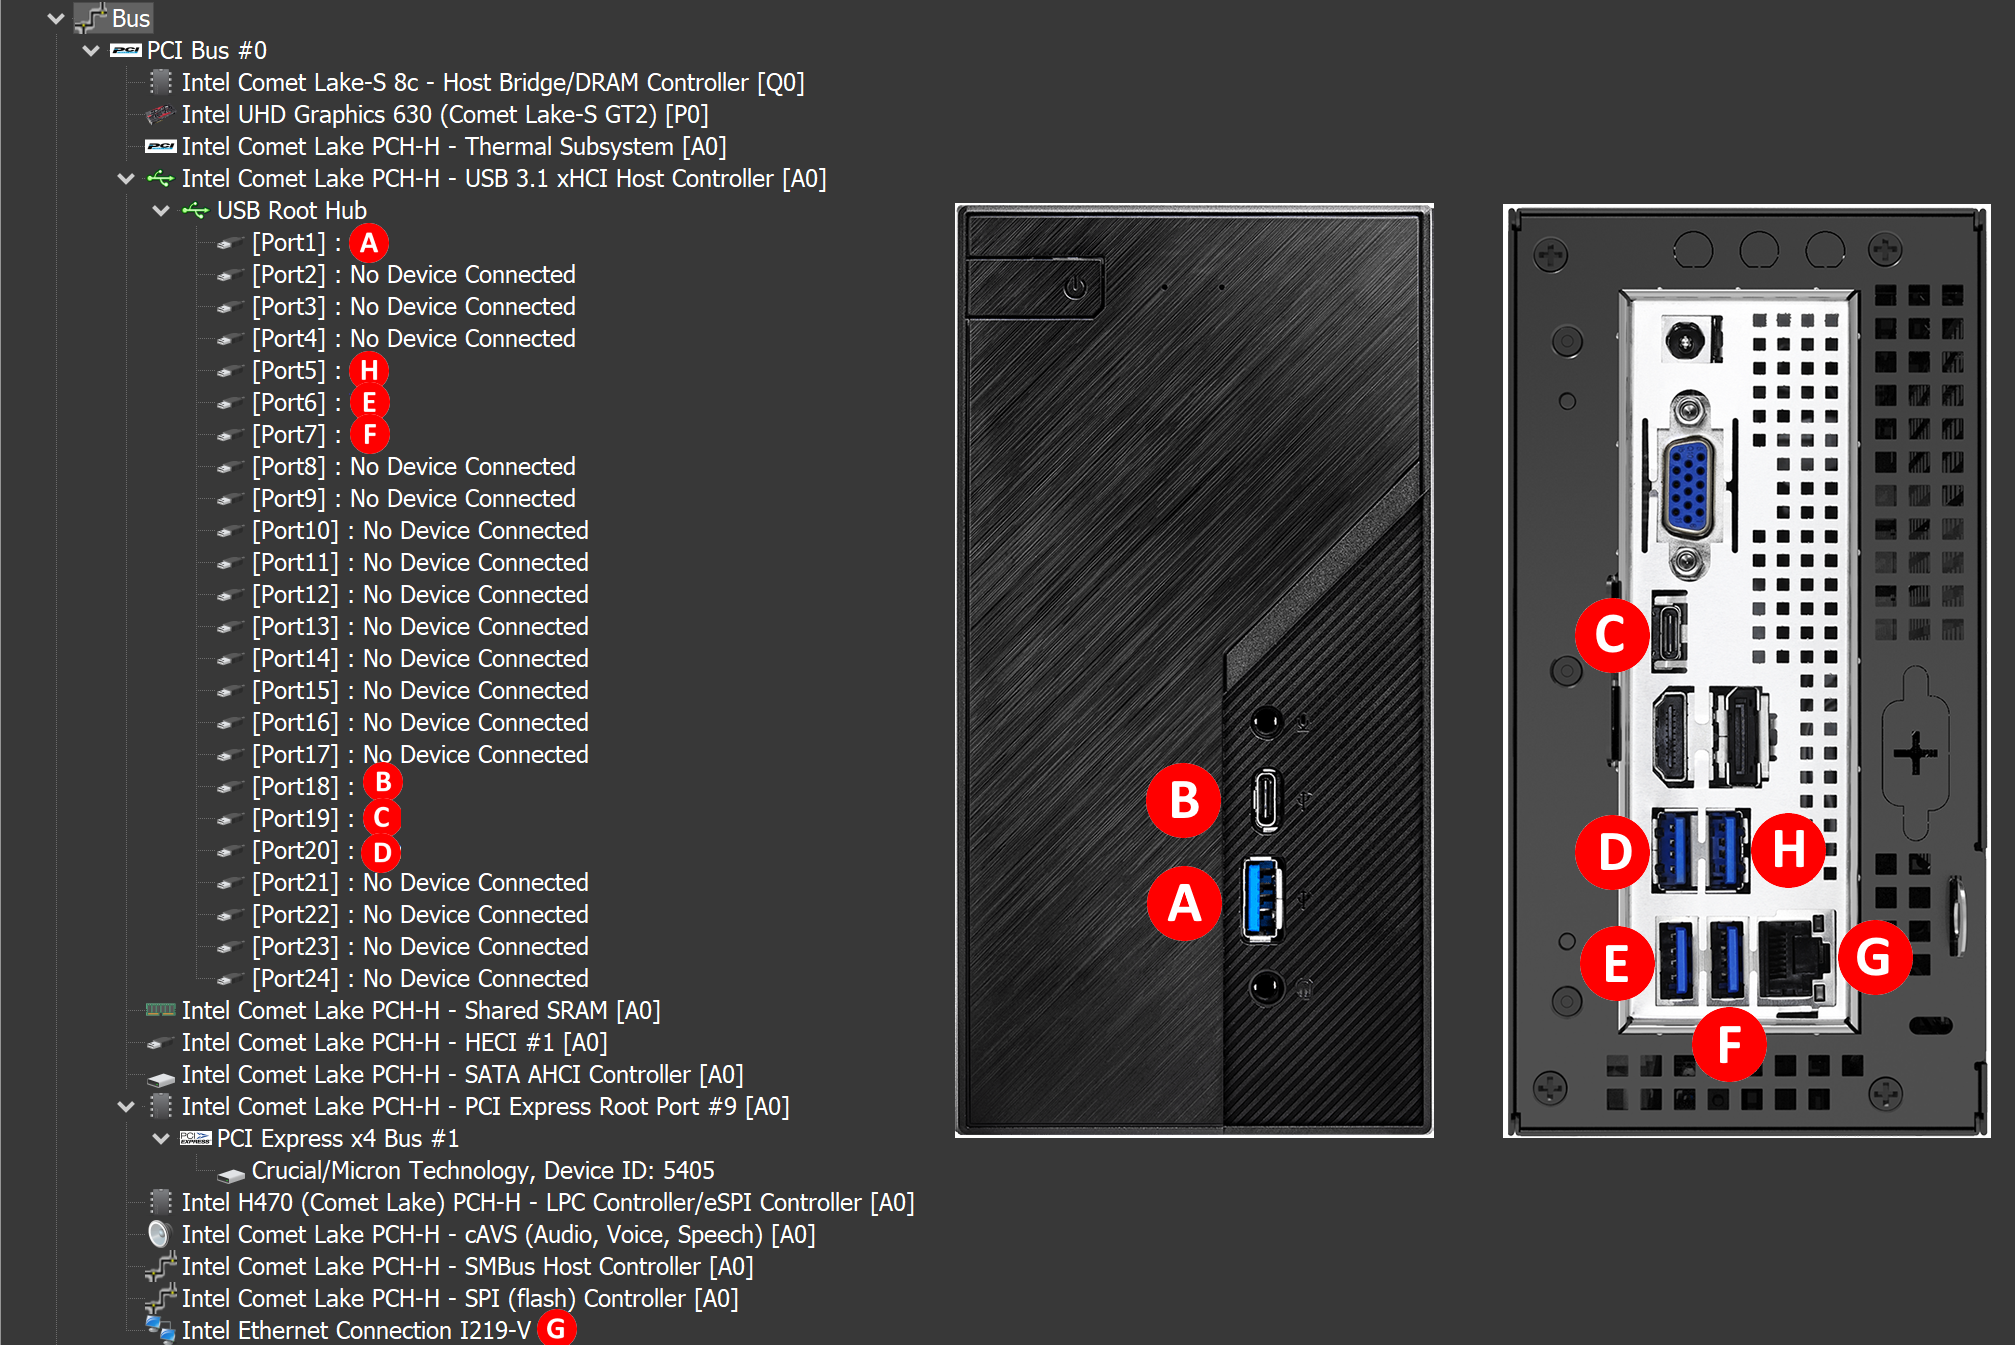
All the USB ports are off a single root hub in the PCH. The ones on the front operate at USB 3.2 Gen 2 (10 Gbps) speeds, while the ones on the rear are at USB 3.2 Gen 1 (5 Gbps) speeds. The USB-C port on the rear also has a DisplayPort signal muxed into it. The I219-V network controller is also off the PCH, as is the PCIe 3.0 x4 lanes set used to hook up the M.2 NVMe slot. In fact, everything here is bottlenecked by the DMI link to the processor which has PCIe 3.0 x4 lanes worth of bandwidth. The DeskMini H470 is too small to take advantage of the PCIe 3.0 x16 lanes directly from the CPU, but it does seem to be ready for four PCIe 4.0 lanes directly attached to the upcoming Rocket Lake processors.M/p>
Benchmarks and Performance
In the remainder of this review, we will first look at BAPCo's SYSmark 25, followed by various UL benchmarks and miscellaneous workloads. We also present some storage performance numbers. A detailed look at the HTPC credentials of the system is followed by testing of the power consumption and thermal solution.
| Comparative PC Configurations | ||
| Aspect | ASRock DeskMini H470 | |
| CPU | Intel Core i7-10700 | Intel Core i7-10700 |
| GPU | Intel UHD Graphics 630 | Intel UHD Graphics 630 |
| RAM | Kingston HyperX HX432S20IUB2K2/16 DDR4 SODIMM 19-21-21-40 @ 2933 MHz 2x8 GB |
Kingston HyperX HX432S20IUB2K2/16 DDR4 SODIMM 19-21-21-40 @ 2933 MHz 2x8 GB |
| Storage | Crucial P5 CT1000P5SSD8 (1 TB; M.2 Type 2280 PCIe 3.0 x4 NVMe; Micron 96L 3D TLC) (Micron DM01B2 In-House Controller) |
Crucial P5 CT1000P5SSD8 (1 TB; M.2 Type 2280 PCIe 3.0 x4 NVMe; Micron 96L 3D TLC) (Micron DM01B2 In-House Controller) |
| Wi-Fi | N/A | N/A |
| Price (in USD, when built) | $194 (barebones) / $708 (as configured / No OS) | $194 (barebones) / $708 (as configured / No OS) |
In the table above, we have an overview of the various systems that we are comparing the ASRock DeskMini H470 against. Note that they may not belong to the same market segment. The relevant configuration details of the machines are provided so that readers have an understanding of why some benchmark numbers are skewed for or against the ASRock DeskMini H470 when we come to those sections.


26 Comments
View All Comments
Tomatotech - Tuesday, December 29, 2020 - link
That’s possibly one of the best possible arrangements for the m.2 slot then as the metal tray will be an excellent heat sink. You could even add a bit of thermally conductive foam (make sure it’s not the electrically conductive type) to help with heat transfer to the tray.ganeshts - Tuesday, December 29, 2020 - link
The Ultra M.2 slot is on the top side of the board. That is the one used with Comet Lake CPUs. The slot you are referring to is the Hyper M.2 (PCIe 4.0 x4) slot which is usable only when the Rocket Lake CPUs come around.twotwotwo - Tuesday, December 29, 2020 - link
Its AMD relative the A300 was my main machine for a while, and had it been easier to get Zen 2 desktop APUs I might still be using it. Quiet (given a decent fan), cheap, tiny (obvs), reasonably expandable, gets the job done--about all I can ask for from a work desktop.Death666Angel - Tuesday, December 29, 2020 - link
The 4000 Series Pro APUs are pretty well available in Germany, from reputable online retailers. I can get the R5 Pro 4650G for 20% more than the equivalent R5 3600 (200€ vs 240€ roughly). That would be my sweet spot, personally. For 8 cores it's also roughly 20% (280€ vs 340€) but for that price difference, you could get a nice used GPU already that will maybe game better. I personally could never justify a GPU-less build, although I am eternally curious about them and plot one out once every couple of months.... and then I look at benchmarks of dGPU vs iGPU and stop. :DTomatotech - Tuesday, December 29, 2020 - link
I didn’t see it in the article so here are the specs:155 x 155 x 80 mm (1.92L)
Not bad, though for most low to mid-level use cases it’d be far cheaper to buy a used Lenovo or Dell USFF PC - these have even less volume at around 1.1L but are slightly larger and flatter (around 180x180x35mm)
For SFF with GPU I still prefer something like the K39 mITX chassis on the low end which comes in at 3L but allows you to use most full-sized GPUs (but for now possibly not the nVidia 3000 series).
Samus - Tuesday, December 29, 2020 - link
I've been rocking the FT03-Mini and while it is an absolute nightmare to work inside of (and I question my sanity for why I put myself through owning it) it is still a very effective ITX chassis for the size, capable of 10.5" videocards, multiple hard drives (plus two m2 drives you can mount to most current motherboards) while using a single 140mm fan to cool everything. Realistically the highest TDP CPU you want to use is around 88-watts as anything more you will stress any closed loop cooler with a 25mm radiator (the max the case can accept) and need to go to a heatsink of some sort with another dedicated fan.Obrut - Tuesday, December 29, 2020 - link
It will be interesting to see a comparison with ASRock Jupiter H470, which has a much different form factor and cooling solution.M O B - Tuesday, December 29, 2020 - link
I have a Deskmini 310w--is the UHD 630 on 10th gen CPUs any faster than the UHD 630 on older CPUs?If not, then it seems like this iteration basically adds some USB 3.0 ports versus my current build.
ganeshts - Wednesday, December 30, 2020 - link
I think the additional angle here is that of a low-cost platform that can take advantage of the RKL-S CPUs coming in 2021. Personally, I also think it is not a great choice to upgrade for those who already have the 310. It is meant more for folks getting their first mSTX machine.Samus - Tuesday, December 29, 2020 - link
I had the SST-AR11 cooler in my Silverstone FT03-Mini and was pretty disappointed (partially due to the chassis inherently poor ventilation) and equally disappointed by closed-loop coolers due to the 25mm thickness limitation of radiators. After spending seemingly hundreds of dollars and way too much time hunting for a thermal solution, some forum posts directed me to try the NT06-Pro, which would theoretically fit this mSTX chassis as long as there is no interference with the power supply.It performs incredible well as you position the fan under the fins and blow the heat away from the motherboard instead of onto it, giving it somewhat of the beneficial effect of a tower-style cooler.