The ASUS ROG Maximus X Apex Review: X Marks the Spot, Literally
by Joe Shields on May 11, 2018 9:00 AM EST- Posted in
- Motherboards
- Intel
- Asus
- ROG
- Aquantia
- 5G
- Coffee Lake
- Z370
Overclocking
Experience with the ASUS ROG Maximus X Apex
Overclocking on the Apex should be nothing short of a fun adventure considering all the features it has for it. Granted, a lot of these features, such as the LN2 mode, slow mode, and others are geared towards extreme/sub-ambient overclocking, but the bottom line is that the board is made to be pushed hard among other things. For all intents and purposes, the Z370 platform doesn't have the same issues X299 ran into regarding VRM cooling and using robust enough heatsinks to remove the heat generated by the power delivery system for these power hungry CPUs. We did not run into premature power limits like the SuperO board, nor did this board magically add voltage even when setting it manually like the newborn NZXT we reviewed. The overall experience worked out quite well - I'm just sad I did not have enough time, or a dewar full of LN2 to really see what this chip can do.
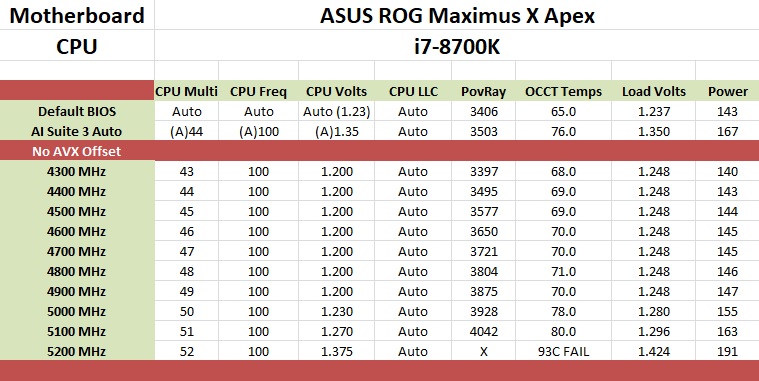
For the auto overclocking, I let AI Suite 3 and its 5-Way Optimization set things up. For our part, we selected all core overclocking then hit start. In the end, the process took about eight minutes to complete and generates a report end showing the clocks, peak voltage, wattage, and temperatures. The final product was a 5 GHz peak clock with the cores set to 50/50/50/50/47/47. Curiously, not all cores were set the same as we requested. When running POV-Ray and OCCT I found a -3 AVX offset used which yielded an all core result of 4.4 GHz (versus 4.3 GHz stock). Single threaded applications did run at 5 GHz. As far as voltage stability, with LLC set to auto, I would see the voltage rise above the set value overload - easily mitigated by adjusting LLC to a less aggressive value.
Manual overclocking was met without any challenges from the board, however, the chip did put up a pretty steep voltage wall, marking the end of that adventure. There are enough options in the BIOS to satisfy most anyone, even competitive overclockers. That said, the ASUS BIOS is straightforward with most everything needed under one major section and a couple of sub-headings making navigation quick and easy. The BIOS also includes several overclocking profiles. From a couple of basic "Gamers'" and "5G" profiles to "380 Mhz BCLK" or "B-die 5300MHz", all the profile profiles (12 in total) are found in the Overclocking presets. I tested out the 340 BCLK profile and it worked fine with my setup. I tried the DDR4 4000 profile but these profiles can give a good starting point for pushing the limits on the attached hardware.
Overclocking Methodology
Our standard overclocking methodology is as follows. We select the automatic overclock options and test for stability with POV-Ray and OCCT to simulate high-end workloads. These stability tests aim to catch any immediate causes for memory or CPU errors.
For manual overclocks, based on the information gathered from the previous testing, starts off at a nominal voltage and CPU multiplier, and the multiplier is increased until the stability tests are failed. The CPU voltage is increased gradually until the stability tests are passed, and the process repeated until the motherboard reduces the multiplier automatically (due to safety protocol) or the CPU temperature reaches a stupidly high level (90ºC+). Our test bed is not in a case, which should push overclocks higher with fresher (cooler) air.
Overclocking Results
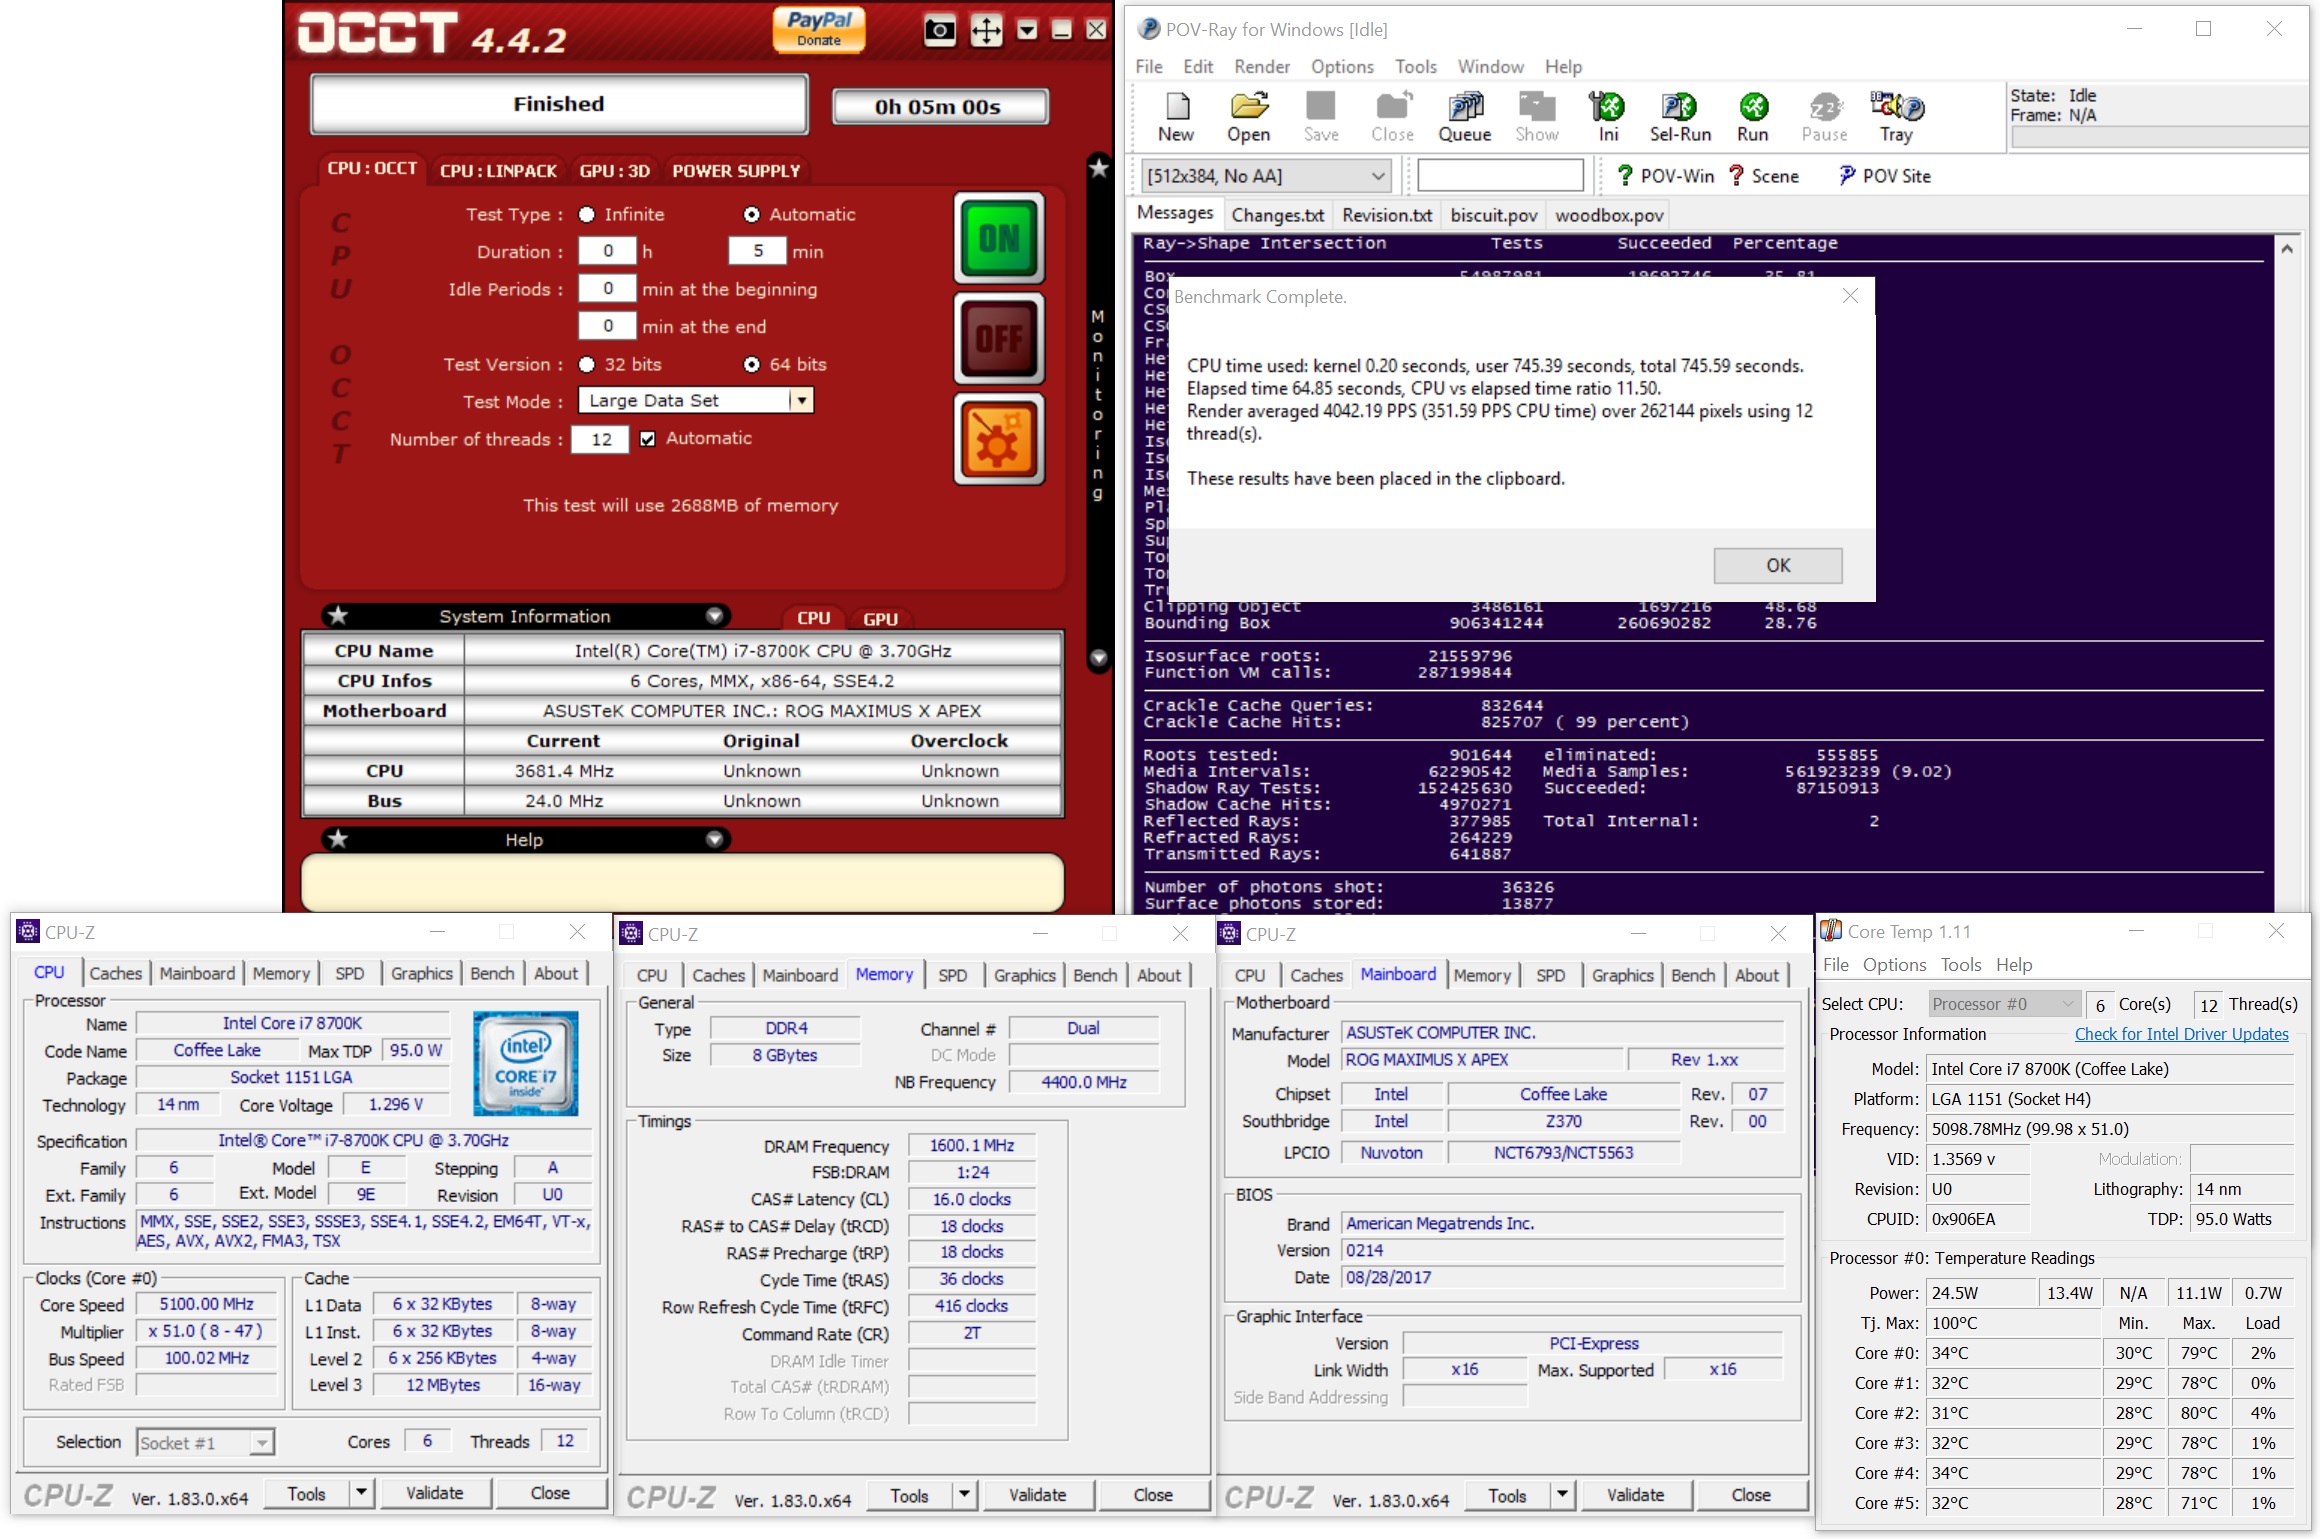
The ASUS ROG Maximus X was able to take our i7-8700K to new heights reaching 5.1 GHz stable (for our testing) at 1.296V (actual voltage reading from DMM). After that, the CPU ended hitting what seems to be a pretty steep voltage wall at 5.2 GHz. In an attempt to get it stable, I pumped 1.375V yielding 1.424V on load. This yielded stability in OCCT testing but was unable to complete a full pass of POV-Ray. Temperatures in the OCCT testing broke our 90C threshold anyway, so this was our stopping point. I was able to get our memory to 3600 MHz without issue manually, though surprisingly (perhaps due to our kit), I was unable to get either 3733 or 4000 Mhz profiles working with the Corsair sticks. I dropped in a different set of RAM (DDR4-3600) and the profiles didn't have an issue loading up. As always, your mileage may vary when it comes to manual overclocking as well as presets working globally.


39 Comments
View All Comments
evernessince - Friday, May 18, 2018 - link
That's a limitation of the chipset. If you want more USB ports on a consumer motherboard you have to get a Ryzen motherboard. The X370 Hero has 14 USB ports on it. Ryzen and the X370 chipset simply support more USB ports.WithoutWeakness - Friday, May 11, 2018 - link
> Regular ATX board that they decided to have random cutouts and extensions on the PCB that now requires an E-ATX compatible chassis> 10 fan/pump headers and water flow and temperature headers
> 4 full-length PCIe slots and an included SLI-HB bridge
> 5 Gigabit ethernet
> Only 2 RAM slots???
> $400???
I understand the appeal of the overclocking features and why people would look to buy this board if they wanted to push their overclocks another 100MHz but why is there such an absolutely absurd mishmash of features included like 4x PCIe lanes (without a PLX chip) and 5GbE? I feel like they took their original design for what should be the Maximus X Extreme and just started haphazardly trimming features like RAM slots and PLX support until they hit the $400 price point and said "ship it".
Really interested in the opinion of anyone who be looking to buy this board.
ggathagan - Friday, May 11, 2018 - link
I don't disagree with your overall point, but limiting the board to a pair of DIMM slots makes sense for a board that purports to be focused on overclocking.I don't recall any motherboard that can overclock with 4 DIMM slots populated as well as it can with only 2 slots populated.
mapesdhs - Monday, May 14, 2018 - link
Rampage IV Extreme might come close.The_Assimilator - Friday, May 11, 2018 - link
> talks about DIMM.2 slot> doesn't show any pictures of it with M.2 drives installed
> doesn't do any M.2 tests at all in fact
Billy Tallis - Friday, May 11, 2018 - link
What kind of tests do you want? It's a passive PCIe riser. It doesn't affect performance, it just relocates the M.2 slots away from your GPU(s).The_Assimilator - Saturday, May 12, 2018 - link
"It doesn't affect performance" Patently false, since reviews of M.2 drives by many sites - including this very one - have demonstrated that the highest-end models throttle during sustained workloads.Regardless of performance, DIMM.2 is a feature unique to this motherboard, and as such it should be covered by any review.
The test is relatively simple: temperatures/sustained transfer rates of a drive when using DIMM.2, vs those of the same drive mounted directly against the motherboard, vs that drive mounted against the motherboard but with the motherboards's supplied M.2 heatsink applied. For example, this board vs the recently-reviewed X299 XPower Gaming AC's M.2 cooling solution.
It should be something relatively simple to do and would make a great stand-alone article to answer the question that many people have, namely whether these fancy cooling solutions do have an effect on their M.2 drives' temperatures.
SlyNine - Friday, May 11, 2018 - link
Glad to see some more AMD *squints eyes* Intel boardsCityZ - Friday, May 11, 2018 - link
You see that connector between the SATA ports and the molex? Guess what it is.boozed - Friday, May 11, 2018 - link
The opening sentence gave me cancer.